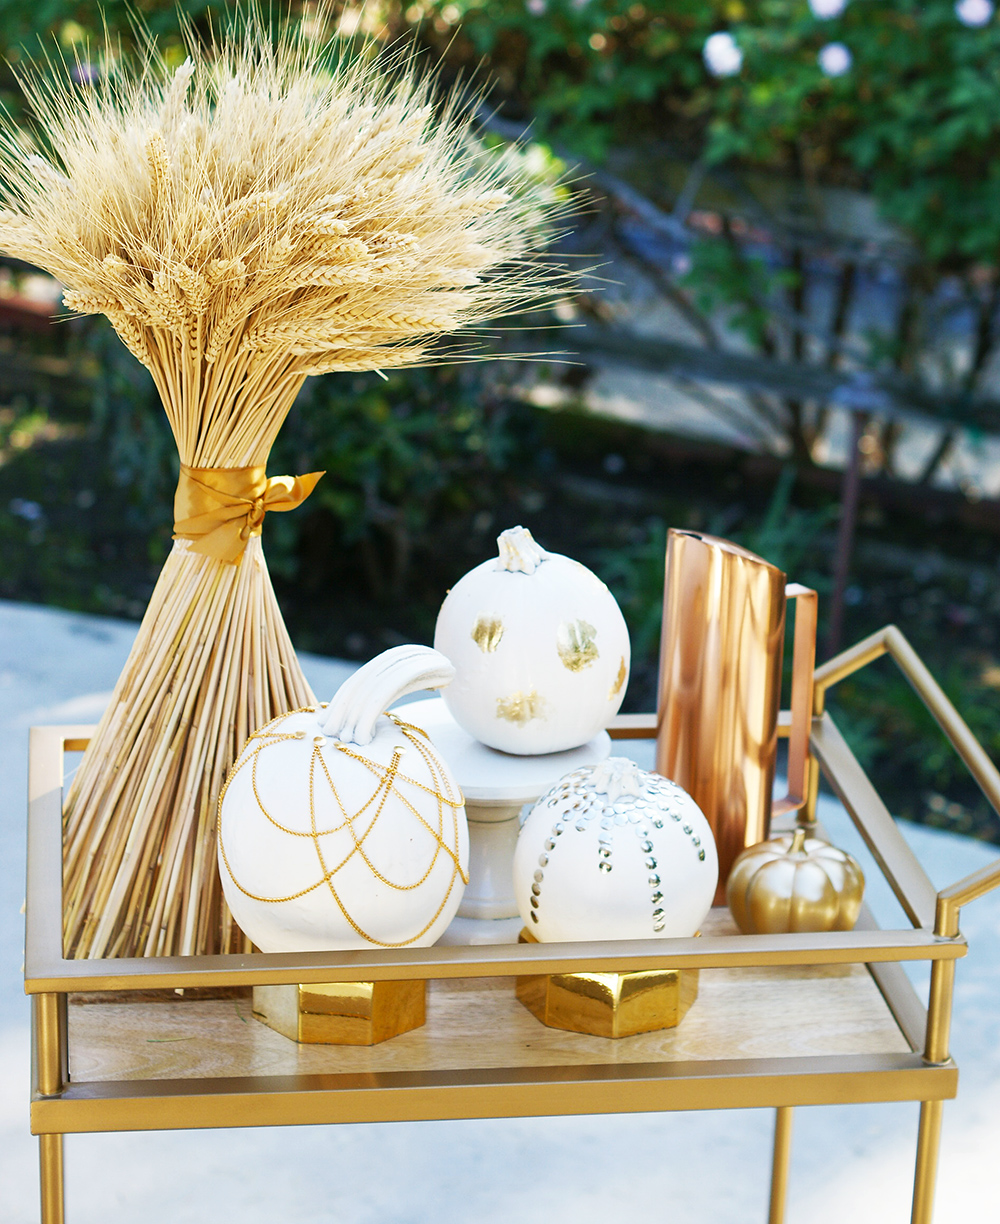
Thanksgiving is around the corner and while some are scrambling for the perfect turkey recipe, I’m over here spray painting some pumpkins. I get overzealous with the pumpkin collecting around Halloween, and Thanksgiving is really the last chance you have to make them shine before they are replaced with evergreens and all things peppermint.
So what does one do when you still have pumpkins left after setting some aside for pumpkin pie, soup and bread? You can use them to decorate your dinner table–however, orange is not the new black on my table this year. But, GOLD is definitely the new black!
Looking to glam up these pumpkins I couldn’t settle on just one design. So we’re doing them 3 ways here people. Each with metallic accents they go well together all while making your turkey think he’s on the catwalk.
To start your glam pumpkins DIY, I used a matte off white spray paint on my orange pumpkins that I elevated on paper cups so I can spray the bottoms. Although if you can get your hands on white pumpkins then you can definitely skip this step. However, the Rustoleum Heirloom White paint, makes them look almost ceramic.
 Once your pumpkins are good and dry you’re ready to start the glamming process. First up, “The Studded Rocker”
 Using standard office thumbtacks in silver or gold, go town on your pumpkin in any pattern you like. I chose to keep it simple and a little art deco by doing vertical lines in alternating lengths. It helps that pumpkins come with lines built right in.
Next up on the runway, “The Gilded Gourd”
 I have quite an obsession with gold foil. It’s so easy to use and makes everything look amazing. Here I used the foil adhesive in the pen form but you can just as easily do this with the kind you brush on. Just brush on the adhesive in an abstract way all around the pumpkin-note you definitely want to scratch the pumpkin slightly or use a pencil to mark where you’re putting the adhesive since you won’t be able to see it against the white. Wait about 10 minutes for the adhesive to turn clear and get tacky, then touch the gold foil sheet to the adhesive areas. It will stick, and you can use your finger to brush away any excess.
And finally on our glam pumpkin tour “The Chained Diva”
This is one of my faves just because its so simple, but soooo awesome. I used a roll of costume jewelry chain along with some thumbtacks. The chain cuts easily with a wire cutter or tough scissors. Cut into various lengths, some short and some long. Use the thumbtacks to pin one end of the chains to the pumpkin and another tack to attach the opposite side, forming a little necklace like loop. Repeat while crisscrossing the placement of the thumbtacks so the chains overlap a bit.
And there you have it, 3 amazeballs pumpkins to use as a centerpiece on your Thanksgiving table or even on your mantle. Make several of one variation or make all 3–you can’t go wrong with these. I used them to dress up my bar cart in the meantime while waiting for Turkey day.

So how would you glam up your pumpkins? Leave and comment and let me know!

// SOURCES //
Spray Paint: Rustoleum Heirloom White Spray Paint
Gold Leaf: Speedball Mona Lisa Gold Leaf Kit
Gold craft chains: ILOVEDIY 3m Gold Plated Chain
Silver Thumbtacks: BAZIC Silver Nickel Thumb Tacks


